
Windows 7 Basics
What is a GUI (Graphics User Interface)
|
If you have ever heard the term GUI, you may be thinking of a hot brownie that Grandma just pulled fresh out of the oven. But the term GUI in the Tech World means Graphics User Interface. This is basically an Operating Systems that uses graphics to perform tasks rather then the old way of a series of commands.
Back in the early years of Computing, the only way of communication between humans and computers was through what is called Command Line Interfaces (CLI). Command line required that instead of actually seeing an icon to click, or a program to open, one would have to enter a string of codes to perform an action. But when Windows was introduced to the World, it had new ideas for computing, and that is where Microsoft Windows was born. Just to be fair other manufacturers did design GUI's in the early years, but this is a Windows lesson, and I am a Windows guy, so we will stick with the Windows side of things. The name "Windows" came about because the early graphics icons looked like screens, AKA Windows, and so they named it WIndows. How creative they are!! HA. When Windows first came out, it was designed to be an easy interface for anyone to be able to use, and though its got much more complex over time, that is still their main focus. The GUI interface has molded the World into an easy to use and easy to learn graphical dimension. In other words, if we had to still rely on command line to use a computer these days, we would all be up the creek with out a paddle, so change is good, and new Technology makes the technology World go around. |
WIndows 7 Basics
|
Microsoft Windows 7 is known as the most stable Operating Systems that Microsoft has ever released. Though it will come to end of life one day soon, to make room for the new Operating Systems, It is still one of the most used Operating Systems used Today.
Because of its popularity, and the fact that so many people still use it, I am going to going over some basic functions of Windows 7, as well a few things that you may not have ever known. Dont miss out in the future some advanced features and tips on WIndows 7 and other Operating Systems. WIth that being said, I assume that since you are able to navigate your way to the internet and reach my website, that some of the very basics can be skipped, but I will bullet point them along the way for reference, just so we all are on the same page. |
The Desktop
|
The desktop in Windows 7 is the main screen that you land on after logging into your computer. It features all of your program or folder shortcut icons for quick access if you choose. As well as the start menu, and the task bar.
Each user will have their own desktop that can be setup to their personal liking, This means that each user that logs into a user account can have their own desktop shortcuts to programs and folders, as well as desktop backgrounds and features. Lets get started with the Desktop by learning the properties, viewing, and other setting that I like to call "The right click settings' Pretty unique isnt it? By Right clicking anywhere there is not an icon on the desktop it will give you some of the desktops features. While most are pretty self explanatory as their names imply like the view options allow you to customize the desktop view, Refresh is to refresh the desktop screen, and sort by allows you to sort shortcuts, files and folders in specific order. You also have options here to access the Graphics options for the video card and display settings if the video card software is installed, the personalize feature is for changing your background and desktop settings. Here you can change your desktop background picture, set a screen saver for when you are not using your computer, along with some other more advanced features that we will go over at a later date. The Screen resolutions setting is where you change the screen resolution of your screen. By default, your video card will be able to detect the recommended screen resolution, but you have the option to change that here. You can also manage your dual screens here if you have dual screen attached to your computer. Again, the screen resolution should be detected, but one of the most changed settings here is for dual screen and its changing the Multiple Displays option from Extended to Mirrored. Try is out if you have dual screens and see the difference. The Windows 7 "Gadgets" feature allows you to add a gadget to your desktop. Want to add a clock or calender gadget where it displays right on your desktop? Or even a weather gadget to keep an eye on the weather? The Gadgets feature is the place to go to add these fun features. One of the most used feature in the right click options is the "New" feature. If you ever wanted to create a folder on your desktop, choose new, then folder and a folder will be created on the desktop. You can easily right click the folder and change it to whatever name you desire as well. You can also create a shortcut from the "New" Feature. This can be a shortcut to a folder, a program, or even a website. And last I am going to talk about in the right click features of desktop is the "Compressed Zip" Folder. Creating a Compressed zip folder and adding your personal files or folders to it, actually shrinks the files within the zip file and allows it easier to send via email, or even save room on a disk. This will actually cut the entire folders content into a smaller size. While the desktop is a great place to house all of your shortcut icons, I do not suggest making it a place to store all your files and folders. This is what the My Documents folder was designed for, and it helps keep the clutter down on your desktop. Its ok to have a few quick access folders on your desktop, but consider using the My Documents shortcut instead. |
The Start Button/Menu

|
Everything starts with the "Start Button" in any of the modern Windows Operating Systems. The idea of the start button was to organize all accessible features into a one click button for access to nearly all features, settings, and programs within the operating System which is called the start menu.
The Start Button is a structured menu that gives you access to most, if not all of the features and settings within the Operating System. From starting a program up, to navigating to your My Documents folder. the start menu will always get you to where you want to go in Windows to get around. You can access the start menu by clicing on the start button icon on the bottom left corner of your desktop, or you can always click on the "Windows" key on your keyboard to pull it up as well. Its an easy keyboard shortcut used by the geeks. It is often misunderstood by users that if you do not see the Icon for a program on the "Desktop" then it is no longer on your computer. Well actually everything on the desktop is actually a shortcut to what you can access in the start menu. So to make it easy, if you have Microsoft Word installed on your computer, and the icon is not showing up on your desktop, This just means that the shortcut icon on the desktop was removed or never placed. You can easily browse to the start button, click on all programs, and locate the program icon there to open it. If you want that icon to be shown on your desktop, simply locate the icon, and right click it with your mouse, choose "Send to" and then click on "Desktop (create shortcut). This will place a shortcut on the desktop for quick access the next time you open the program. This feature can actually be performed with nearly everything accessible in the start button. The start menu is where all programs, features, advanced features, and file folders are accessed. However, the features that you find yourself accessing most often show up above the All Programs and are basically your most recent opened features in a shortcut form.. You can add and remove programs or features to and from this list for quick access by using the right click, "Pin to Start Menu" feature. Now that we have an understanding of the start buttons functionality, lets learn what we can access within the Start Button |
The Left Panel/Start Menu
All Programs (Bottom Left) |
Search Programs and Files (Bottom Left) |
|
The All Programs function is simply for accessing all installed programs installed on the computer. This will consist of programs that you have installed, as well as integrated and pre-installed programs that come with Windows 7.
By clicking on the start button, then "All Programs, a list of all installed programs will populate in an easy to navigate tree form. Like the icons on the desktop, these are actually shortcuts themselves too, and by removing them from all programs, does not actually remove them from your computer permanently. Just like in the start button, you will see most recent programs opened at the top of "All Programs" These can be removed from the all programs recent bar, or pinned to the start button or even the task bar by right clicking them. We will get further into the task bar later. To access a program in All Programs, simply click on the start button, click "All Programs", locate the program you want to open and drill down to the icon and click it, and the program will open up. Like I mentioned previously, you can also add it to the Desktop as a shortcut for quicker access in the future. |
The search feature on the bottom of the start button can be used for a quick way to search for files, folders, programs or features within Windows 7. It is as easy as entering in a keyword in the search field, and items from your keyword entered will populate.
This feature comes in handy for many reasons. For instance, if you wanted to quickly access a program, we will say Microsoft Word, simply type in "word" in the search field, the icon will populate, and clicking on it will open the program up. This is also handy for accessing files and folders quickly. If you created a Word Document called "Christmas List" for instance, simply type it in the search field, and when it populates, click on it to open it. you can do the same for folders as well to access all the files within that particular folder. Features of WIndows 7 can be easily accessed through search as well. For instance if you wanted to open up the "Programs & Features" function for removing a program from your computer, simply type it in and when it populates, click to open it. Search is your friend in the Windows Operating system, and using it makes life easy. |
The Right Panel/Start Menu
Shutdown (Bottom Right) |
User Account Control (Top Right) |
|
The Shutdown feature is more then just the place for shutting down your computer. Here you can, switch users, log off, lock, restart it, put it to sleep and in hibernation mode. By clicking the SHUTDOWN icon, it will completely close all opened programs automatically, shut down Windows, and power your computer off. Clicking on the arrow to the right of SHUTDOWN will provide access to the other features within.
The Switch users feature is a quick way to switch to another User account. If you have an account setup on your computer for you, and one for your kids or siblings for instance, you can use this feature to quickly switch between users accounts. The Log off feature will close all of your opened programs, and log off Windows, keeping Windows active for quick access to getting back in. Using the log off feature is something I highly suggest using while not using the computer as it is a good security feature assuming you have a password set on your account which again, I highly suggest. The lock feature is like the Log off feature, except it does not close all running programs down. It simply locks your computer for safe keeping while you are away. Another great security feature to use assuming you have a Windows password set, Try using the Windows key + L on your keyboard for locking your computer quickly. Its a keyboard shortcut for the lock feature. The restart feature will close all opened programs, as well as shutdown Windows, and restart your computer. This feature is used a lot when updates to your computer are made, after installing a program that requires a restart, and even to clear up common minor issues with your computer. Try restarting your computer next time you are having a minor or wacky issues to clear up the problem, it actually does work. The last two features are sleep and Hibernate. While these features do have their advantages, they are rarely used within the Shutdown function. For that reason we will skip these two features for now, and I will be going over then in a more advanced lesson. |
I imagine that there are even some advanced users that do not know that there is actually a quick way to access "User Account Control" on the start menu. It is located at the top right panel of the start button, and it is your User account icon. Like the fish, or the guitar, or soccer ball.
First off, lets get familiar with what a user account does. If you have more then one person that needs to use your computer, you can separate logins for each user by creating what is called a user account. What that does is actually gives each user their own login to Windows, their own Desktop with whatever icons shortcuts to programs or even desktop background they want displayed, as well as their own "My Documents" folder for storing pictures, music, videos as well as important documents in. This makes it easy to separate data, as well as gives each user the peace of mind of privacy. Each user will have their own username, password, and icon associated with their account. Clicking on the Icon at the top right of the start menu, just above the users name, will take you directly to the User Account Control feature. Here you can create new accounts, and even provide each user with access rights. This gets us into a bit of an advanced feature so I will save that for a later lesson. This feature can also be accessed through the control panel, or by typing its name in search, It is good to note that this is also a quick and easy way to reset your user account password, change your user account icon picture, or even change your user account name. These features are all part of the User Account Control function. |
Personal Folders |
My Documents |
|
By clicking on your computer user name within the start menu, (Just under your User Icon) it gives you quick access to all your user personal folders. While this provides quick access to your My Documents folder where your personal pictures, music, videos and important documents are, it also gives you the option to access your Windows folders as well.
On the left panel of this quick access to personal folders, you will find quick access icons for things like your desktop folder (Everything within your desktop) downloads folder which holds all of your downloaded files, and other quick access icons to other folders within your user account. You will find this left panel feature in all folders you open in the Windows 7 Operating System. |
Just below your username (Personal Folders access) is the My Documents access icon. It is yet another way to quickly access you My Documents folder. You will find that in Windows 7 there are several ways to access a single feature. It just gives you the option to access them in many ways.
The My documents access icon can also be right clicked like the programs icons, and there are features like the "Send To" , Desktop to create a shortcut to your my documents folder to be quickly accessed on your desktop. You can also choose to add it to the folders properties here for more advanced features for the folder. |
Pictures Folder |
Music Folder |
|
You can quickly access your personal Pictures folder by clicking on the Pictures icon in the start menu. This is one of many ways to access your My Pictures folder. You can also right click the folder and access the shortcut features, as well as access the properties of the My Pictures folder.
|
You can quickly access your personal Music folder by clicking on the Music icon in the start menu. This is one of many ways to access your Music folder. You can also right click the folder and access the shortcut features, as well as access the properties of the Music folder.
|
Computer (My Computer) |
Control Panel |
|
The "Computer" also known as "My Computer" can be accessed many ways, but through the start menu it is under an icon labeled "Computer". This is where you can access your drives including the local hard drive, any attached drives, or your DVD or CD drive.
When you attach an external hard drive or flash drive to your computer, this is where you will find them. This is also where you can find any attached network drives that you may have access too which is more for a networked environment, or work for instance. At the top of the Windows 7 Computer folder, you can do things access the properties of the folder, which is where you will find features like the disk cleanup tool, fragment tool, and even a backup Windows option. I will go over these features in more detail in another lesson. You can also organize your folders, map a network drive, quickly access the Control Panel, or go quickly to the add/remove programs feature of Windows within the top menu of the Computer folder. The C: Drive is you main local drive where everything is stored that is on your computer. It is actually your Hard Drive, labeled with the standard drive letter of C otherwise known as a partitioned drive. This is where every folder and file on your computer is stored (Not the shortcut version) I do not suggest getting to deep into this folder unless you know your stuff. Anytime you plug a flash drive, external hard drive, or any type of external memory like an SD card into your computer, Windows will assign it a drive letter, and it will be accessible in My Computer. This is how you will can access your drives if they dont automatically open, or you close them after opening. The DVD or CD drive can also be accessed in the Computer Folder. While most DVD or playable CD's start automatically when you insert the disk, access to the files and folders can be accessed within the disk by clicking on the CD/DVD drive. Notice that when you click on the DVD/CD drive that the top menu changes to reflect the features for the CD/DVD drive like autoplay, eject the drive, and the system properties just to name a few. These features are rarely used in general. With Network drives, you tell the computer where on the network the folder is that you want to access, then you assign a drive letter that is not already being assigned by another drive. This is simply a letter associated with the drive assigned and has nothing to do with the actual location of the folder. While this is more of an advanced feature, I figured it wouldn't hurt to explain what it was. |
The Control panel is the folder which holds all of the basic and Advanced system settings. You can access the Control Panel from the start menu by clicking on Control Panel.There is a number of systems settings features within the control panel from the basic settings like changing display and desktop background features, to checking system error logs.
When you first access the Control Panel, it will be setup to be viewed in Category mode. To make things a bit easier to narrow down what feature or settings control you are looking for specifically, I always suggest changing the "View by" Feature (Right top corner) to display small icon mode. This will break out all of the categories individually and makes it a bit easier to locate what setting feature you are looking for. As a techie. I consider the control panel one of the single most important sections of the Windows Operating System. This is because it is where you make all of your system changes, so is also considered the technical side of the operating system. It is very important to know all of the features of the Control Panel if you want to better understand Windows all together, but for this lesson, we will not get to far into each feature, because there is way to much to go over in this section to fully understand the power of the Control Panel and its many functions. You can create a shortcut to the control panel to your desktop if you choose, by right clicking on the start menu "Control Panel" icon and choosing 'Show on desktop". This will add a shortcut to the desktop for quick access. Like every other folder you access in Windows, there is a search feature within. If you are uncertain to what category or where the feature you are looking to change settings for is located, try using the search at the top right of the folder to find what you are looking for. A mimic to the main search feature in start menu, once you start to type keywords, related features will populate. Using the search feature is great anytime for a quick find for anything you may be looking for. In most cases it has to have the keyword in the feature for it to populate, otherwise it may not show any results. Knowing your stuff in the control panel as well as the lingo for each feature will surely give you a good head start to being a bonafied tech geek.So make sure that you continue to follow my website and stay tuned for more advanced feature lessons coming soon. My plan is to add more in depth lessons on some of the advanced features as well as the basic features of WIndows 7. For now however, this is a lesson on the features of the start menu, so we wont go to deep into those features now. |
Devices & Printers |
Default Programs & Help & Support |
|
You can access Devices and printers from the Start Menu by clicking on its name or icon. Devices and printers is the place to add devices or printers to your computer if they are not automatically detected and installed.
It is also the place to change settings or troubleshoot these devices and printers, The main purpose of this feature is for adding a printer While Windows 7 is usually pretty good at finding and installing printers automatically, This is the place to go if you need to install, change settings or troubleshoot a printer or device issue. Devices and printers will also show installed devices like a USB keyboard dongal which is the USB stick you install for a wireless keyboard or mouse, the monitor if one is installed, and even your internet router. You can also remove devices and printers by choosing remove device from the top menu. and following the directions. |
The Default Settings feature can be accessed through the start menu as an optional for setting default programs. While I consider this feature to be more of an advanced feature, there is one feature that is worth talking about which is the Change Autoplay Settings feature.
This feature is for setting the default settings for how things like autoplay when you insert a CD/DVD, for games, pictures, videos and audio on your computer, and many other default play options. As far as the rest of the features in this section goes, we will discuss those in a more advanced lesson. Help & support is just that, help and support options for how tos on many basic features as well as many I have discussed in this lesson. It is a great place to learn things, and I suggest it for those that need that extra help sometimes navigating through WIndows, |
Recycle Bin (trash Can)
|
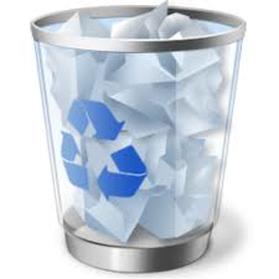
When you delete a file, folder, or shortcut on your computer it will go to the Recycle bin or trash can. This is what I like to call a final resting place for these file types, and its not a viable option for storing files or folders contrary to popular belief.
The Recycle Bin was put in place to store items that you delete temporarily just in case you accidentally deleted it. While I say temporarily, it will actually store them until they are deleted. This should be done often to save disk space on your hard drive. Once these files are deleted from the Recycle Bin they are in theory non recoverable. Though the truth is there are programs that can be used to recover a file deleted out of the recycle bin which is a bit more advanced then this lesson. By clicking on the Recycle bin, you will see a list of all files, folders, shortcuts that have been deleted. If you click an individual file, a screen will appear giving you the option to restore it to its original location. you can also right click to delete or recover an individual file, or use the top menu to perform the same action,. If you want to skip accessing the Recycle bin all together to remove files from it, simply right click the trash can on your desktop, and choose empty Recycle Bin. Here you can access the properties of the Recycle Bin as well. |
The TaskBar
|
The TaskBar in Windows 7 is the horizontal bar at the bottom of the Desktop, and to the right of the Start Button. The taskbar shows what programs or files are opened, it has taskbar shortcuts, as well as the right side which features things like the clock, Notification Icons, as well as Internet Access or the Networking icon.
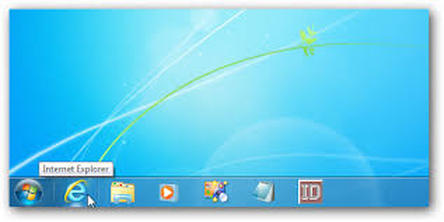
In Windows 7, if a program or application is open, it will diplay an icon of that opened application in the taskbar from left to right starting just to the right of the start button. Sometimes this is actually mistaken for a taskbar shortcut however as well, so lets show how to tell a difference in the two. When a program is highlighted or has a border around it in the taskbar, it is an open program or application. An icon for that program or application with no border is simply a shortcut to open that program from the taskbar, just like the shortcuts on the desktop. Like I mentioned earlier, there are many ways to access things in Windows. |
Notifications Taskbar
Action Center/Power/Network/Sound/Date-Time
Date and Time
Click on arrow to show all Notifications
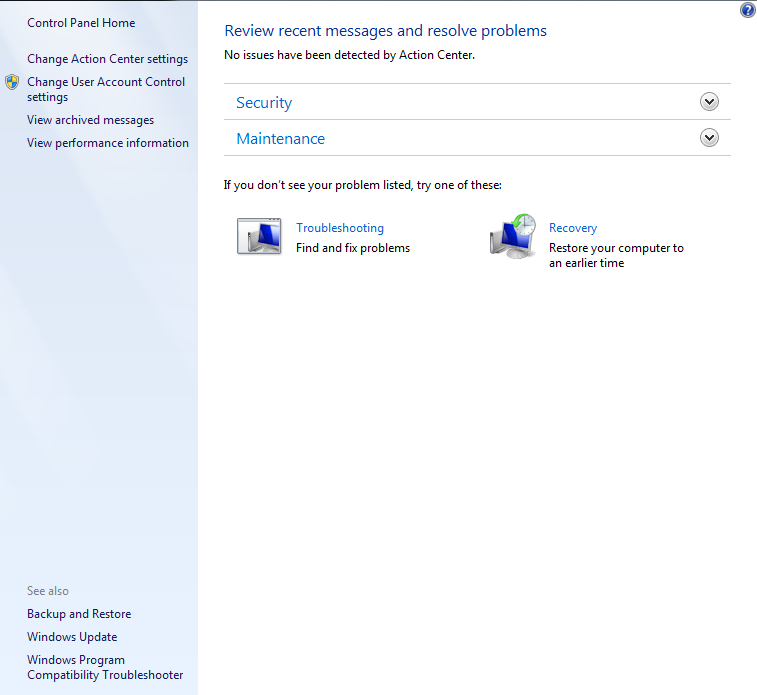
Action Center
Power Options Notification
Network Notifications
Sound
|
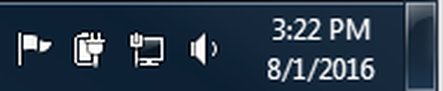
The notifications taskbar is located on the right side of the taskbar and is where you will find your notifications features for things like sound options, The action center, ad your network connections manager.
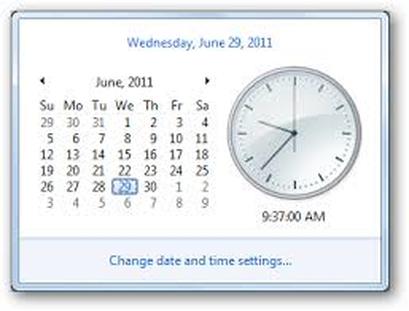
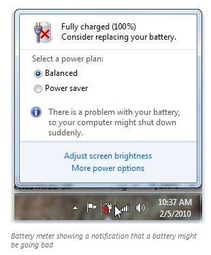
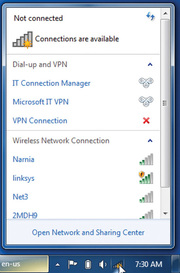
Note: I have notated what each icon is to the left in order from left to right. These are the standard icons only The clock & Date and time feature is located on the notifications bar which naturally display the date and time. By left clicking on the clock, it will bring up the calendar as well as the clock. Within that screen you can also access the Date & Time Settings. This is mostly an automated feature and rarely needs changing unless you change time zones. The notifications taskbar is also where your startup programs will display. These are the programs that startup every time you start Windows. A very important startup program is your AntiVirus program. By default, it will be set to startup when you install it. It is good practice to check it often for updates or problems. The Taskbar makes that easy to do since it always shows up there. If you have several startup programs, you can view them by clicking the arrow on the left side of the icons shown on the right side taskbar. You can also click and drag them out of that area to display them on the taskbar itself for easy viewing. The Solutions Center or Action Center is the white flag in the right side taskbar. When Windows detects a problem with Windows. It will also provide troubleshooting steps if available for the problem. The Action center will notify you when things like Antivirus is not installed or up to date, as well as when your firewall is turned off. It will notify you if you haven't setup a backup job if you choose to use Windows for creating backup jobs. You also have a quick way to access Windows troubleshooting feature as well as recovery which will restore your computer to an earlier date. I will get into that later. Don't rely on the action center to detect or resolve all Windows based issues.It was not designed to detect and resolve all problems, and even problems that it does detect may not be fixable through its troubleshooting process. If you are using a laptop, you will either see a Battery Icon, or a Power plug meaning you are plugged in. This will also display the battery strength, and time remaining until charging is needed, as well as if it is charging or not. Clicking on these icons will give you options for changing the Windows Power Options. Power options allows you to change options like when to dim or turn the screen, and actions that can help to save power when using battery, and disengage when using a wired power option. We will get further into that in a later lesson. The Network Center is for managing your network connections. This is for Internet connections like a Wireless or wired connection to the internet. Here you can establish a wireless connection, assure your connection to either wireless or wireless is active, and by right clicking you can troubleshoot the connection which comes in handy. Clicking on the icon will bring up your Wireless network connections for easy access to establish a network connection. Simply click on the connection you wish to connect too, enter the security key if applicable, and a connection will be made to that wireless network. It is also a shortcut to getting to Network and Sharing Center where there are many other options available from managing your wireless connections to advanced sharing settings. I would consider this section a more advanced section with the exception of the manage wireless connections which could be helpful to remove some of the many wireless connections that you acquire over time. The Sound icon is also on the right panel of the taskbar. This is where you adjust the computers volume as well as tweek the mixer settings. right clicking the sound icon will bring up more advanced options for sound management. Left clicking the icon one time will bring up the volume slider and allow you to adjust the speaker volume up and down. |
Taskbar Options/Toolbars/taskbar/Properties
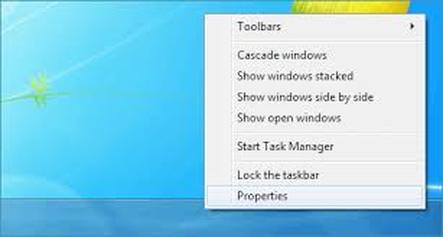
Taskbar Program Shortcuts

Task Manager
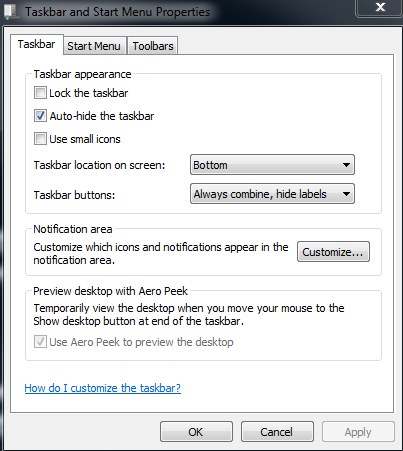
Taskbar & Start Menu Properties
Start Menu Tab
|
The taskbar/Toolbar and Properties
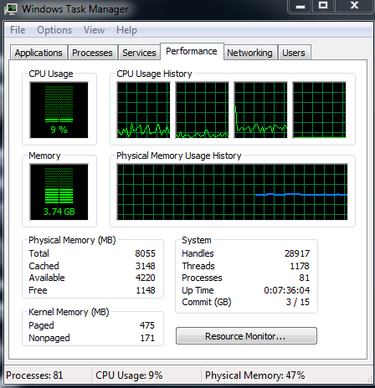
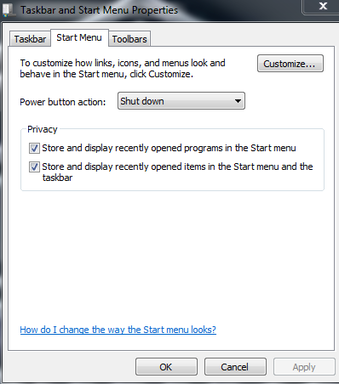
By right clicking anywhere that an icon is not present on the taskbar, you will notice several new options. Most are preference options on how you prefer to view icons and items within the taskbar, but there are a few you may not of been aware that they were located there. The Toolbar's is basically a type of like a shortcut that you can place on your taskbar. You can have shortcuts to websites, to desktop items, or to programs all located within a cascading bar placed on your taskbar. if you run your mouse cursor over toolbars, it gives you options of types of toolbars you can create on the taskbar. I personally don't use toolbars, because its bulky to me, and so it is more of a personal preference option for your taskbar. Feel free to play around with it and see if it works for you. My preferable method of placing shortcuts on the taskbar is strictly for having quick launch program icons for my most used programs or favorite websites. Adding a program shortcut is as easy as dragging the icon from your desktop (For instance Microsoft Word) and dropping it on the left side of the taskbar. It will place a quick access shortcut on the taskbar. Another very important option within the taskbar is the ability to open up the task manager. The task manager is an advanced system manager used for things like stopping frozen applications from running, stopping and starting processes and services, as well as monitoring your computers performance like the RAM allocation and CPU usage. Task Manager is a great tool to know and understand when you begin to learn about more advanced hardware/Software troubleshooting and even virus removal steps. For now, I would use it for things like shutting down an application that isn't responding, or if you get one of those pesky maleware like Ransomware or Rogue Security Software pop ups. Closing them down in Task Manager is the most effective way to assure it closes down without infecting you. Accessing task manager can also be accomplished by pushing CTRL ALT DELETE, and then choosing task manager, or the direct keyboard shortcut is CTRL SHIFT ESC which takes you directly to the task manager. The Properties tab of the task manager will take you into the actual task bar settings, start menu settings, as well as the toolbar settings which is the shortcut links as we already discussed. So let me explain some of these features. When you first arrive at Properties, you will be on the Taskbar tab option. The first 3 options are lock the taskbar, auto hide the taskbar, and use small icons. Lock the taskbar is to lock it where you cant accidentally remove icon shortcuts, or move the taskbar around to different parts of the desktop, because that is an option if you choose. Auto Hide the taskbar is handy to give you back that extra space on the desktop or when you have open programs by minimizing the taskbar to the bottom of the screen. To get it back, simply run your mouse cursor in the area where it minimized. It makes it easy to get to it in case you need it, but hide it when you don't. Use small icons checked does just that, uses a smaller version of shortcut and open program icons on your taskbar when checked. I personally have never used this option, because I would rather not have to squint or lean forward to make out what icon is what. Taskbar location allows you to choose where you want to place the taskbar. By default, it is on the bottom as we all know, however you do have the option to choose which of the 4 corners you want to place it. Taskbar buttons can be combined which means it will stack them rather then place them side by side. Personally I find this method all together confusing, and plus I am old school, so I always keep the default of "Never Combine". In the notifications area you can customize what notifications icons are shown in the notifications taskbar. Clicking on the customize button will allow you to switch on/off notifications features on your notifications taskbar. This can come in handy for removing these notifications if you begin to acquire to many for the taskbar to handle and look pretty at the same time. The start menu tab in taskbar & start menu properties allows you to change the action when pushing the power button on the computer, as well as setting start menu privicy settings. You can also customize the start menu, but its more of an advanced feature for this lesson. The toolbars tab is the same settings as you can access to get into all of these settings as I showed you earlier in this lesson. This tab allows you check what toolbars you want to display, which is exacly what right clicking the taskbar, and going to toolbars does. |
These are some of the basic features of Windows 7. Stay tuned for more advanced feature lessons coming in the future.